
The stages of bath repair and the sequence of bathroom repairs are the same. They don’t write on the Internet about the sequence of bathroom repairs. Trustful people read all this nonsense and believe as if they were reading the Bible.
People not only believe, but also follow the recommendations of these sites so much that they do some of the work with their own hands, and then they call me, proudly tell me about their successes and invite me to finish what they have done.
Imagining in advance how I would have to tear away all their handicrafts from the walls, I come to the apartment and see joyful faces. Faces shining with confidence that the main stages of work they have already done, and I for a couple of days repair will complete.
They wouldn’t think so. I mean, they took the tiles off. They cut the old pipes and laid the new ones, safely “sucking” them to the walls. They poured on the floor three buckets of “self-leveling” mix for the floor, and from above they erected a new cast-iron bath. And the most outstanding prank, the one I can’t look at without pain in the heart – the old towel dryer was cut off, and on short threads taps the size of a child’s football were screwed to the riser.
What could be more interesting and fascinating than building with your own hands? Only to destroy and break with your own hands what is done with those same hands. So, without any hope of being understood, I persuade people to give up their strong convictions in their awareness of repair.
But people don’t share my professional views on their crazy creativity. After my words, women tend to faint. And while my husbands carry them to the bed in their arms, I, feeling the clouds thickening over my head, slowly sneak out the unlocked door.
Every time I’m shocked by what I’ve done, I frown in the streets, accusing myself of indifference and hardness. I should’ve given up on the phone. Explaining that fixing what you did tomorrow today is worse than not doing anything today. There’s no rush.
In order to get it over with, I will write the rules, or stages, or a sequence of works, who likes to repair the bathroom.
All stages of bathroom renovation
Now let’s go through all the stages briefly. Briefly because each stage can be found a separate article on the site, and painted in detail each sequence and the entire order of repair in the bathroom will be too long work.
Dismantling
The first place to start. I think everyone understands why. A separate question that everyone should ask themselves is whether to dismantle the walls or the plumbing. You can read about the dismantling itself in the bathroom here.
Plumbing or plumbing racks.
If your risers need to be replaced, it’s time to do so after dismantling. Replace old iron pipes with new iron pipes. You may have to replace the riser pipe to the neighbors. I mean, in slabs. Especially cold water risers rust. The problem is, your neighbors might be very opposed. But in the event of a pipe failure, it’s forced. Contact the management company and get a replacement.
Leveling the surfaces
Next, fill in the screed and then plaster the walls. Why should the floor be leveled before the walls? To make it easier to align the geometry of the walls. On a flat floor you can draw lines against which beacons are placed. You can immediately see where you can get parallel walls and right angles. In addition, it will be easier to collect plaster mortar from the flat floor, which will fall on the floor.
Planning or project
Now that the surfaces are flat, the sizes of walls and floor are known, the area and so on have been calculated, it’s time to start planning. I won’t be writing about it for long. I will only say that you can do it manually or on your computer. There is an excellent program Sweet Home, which allows you to design a detailed bathroom. The program is very simple. Here
Installation of water supply, sewerage and towel dryer
When a project is ready, all that remains is to install the pipes in such a way that everything corresponds to this very project. It’s up to you to sling the walls and hide the pipes or hide them with drywall boxes. The question for those who like to mount plumbing before leveling the walls: how are you going to level the walls, hung with pipes and towel rails?
About installation of a towel dryer read here.
Electrical Installation
We lay cable for sockets and lighting fixtures. We install the wall sockets ourselves during wall lining with tiles. It is more convenient. First, we cut a hole in the tile, carry it to the wall, cut out or gouged a niche for a wanderer, glue the tile, and then install a wanderer. Otherwise, the sockets will be either in the corners of the tiles or in the joints.
Installation of drywall boxes
The next stage will be the installation of boxes that cover the water and sewerage risers. If you have decided to install a suspended toilet, it is time for installation.
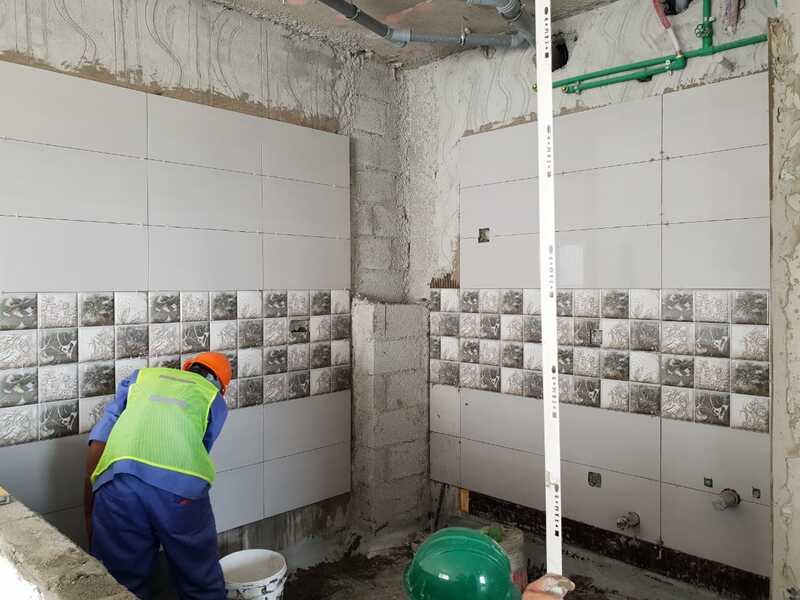
Facing the walls with tiles
This phase of bathroom renovation is quite complex and requires detailed study. Read the article on how to glue tiles. Over time, I will write a more detailed note on this topic, paying more attention to minor nuances.
Installing a bath or shower cubicle
The bathtub is mounted on a tiled floor. This can be done even before the walls are lined. Or tile the walls, leaving room for a row adjacent to the edges of the bath, and then glue the remaining row. Want to know how to install the bath?
Installation of a toilet, towel dryer, etc.
The most exciting stage in the repair, after which everything is transformed before your eyes. By other interests I mean: an extractor fan, sockets, a cabinet with a sink, a mirror or a locker with a mirror, wall lights and other accessories.
Installation of the ceiling and door
Completion of the repair. If you decide to install stretch ceilings, this is the best solution.